WAS-110 multicast upgrade and community firmware recovery
Forgot the root password to a WAS-110 running the 8311 community firmware? Follow along with the reset steps...
If you lack the required networking skills to proceed with this guide, please consider purchasing a SFP Media Buddy and deleting the 8311_root_pwhash environment variable over serial USB within the U-Boot shell.
-
Press Esc on boot to enter the U-Boot shell
-
Delete the
8311_root_pwhashenvironment variableenv delete 8311_root_pwhash env save env save -
Continue to boot into OpenWrt
run bootcmd
The WAS-110 from the Azores factory includes a handy multicast upgrade utility baked into its U-boot bootloader, including models from the following resellers:
- Azores Networks XSS
- E.C.I. Networks EN-XGSFPP-OMAC-V2 (Azores Firmware) Incompatible with the EN-XGSFPP-OMAC
- FiberMall XGSPON-ONU-STICK Incompatible with the XGSPON-ONU-STICK-V8 Potron Bootloader
Upgrade Sequence
The upgrade sequence is tied into the boot delay loop and therefore will not trigger if the U-Boot environment variable bootdelay is less than or equal to zero (0); The default value is three (3).
fw_printenv bootdelay
env print bootdelay
The upgrade sequence will wait 5 seconds for the first magic UDP packet on port 13456. Each packet must include the following header:
block-beta
  block
    columns 1
    ui_sn["Sequence number (4 bytes, starts at 1)"]
    blk_sz["Block size (4 bytes)"]
    unk["Unknown (4 bytes, must not be 0)"]
    img_sz["Image size (4 bytes)"]
    magic["bfw-HGW\0\0\0\0\0\0\0\0\0\0\0\0\0 (20 byte string)"]
    data["Data block (Block size)"]
  end
An ordered bit-map of the blocks received is updated from the sequence number along with the image size as the packets can be sent and received non-sequentially.
Once all the blocks have been received the upgrade will commence from the final image stored at the hardcoded offset 0x82000000 (U-Boot environment variable loadaddr) with the following command sequence:
nand erase.part system_sw; run ubi_init; run switchbankA && upgrade 0x82000000 0x<size>
run switchbankB && upgrade 0x82000000 0x<size>
ubi remove rootfs_data && ubi create rootfs_data 0x2000000
Image format
The 8311 community firmware archives include the multicast images, skip past to the Upgrade Script to get started!
The multicast image is a concatenated binary blob of the following uImage files: kernel.bin, bootcore.bin, and rootfs.img.
Install packages Debian Linux
sudo apt-get -y install u-boot-tools squashfs-tools 7zip
Blobs
The following blobs can be obtained from the 8311 community firmware archive or personal backups after following the dump & backup firmware guide.
- kernel.bin
-
dumpimage -T kernel kernel.bin -o zImage 7z e -so zImage > vmlinux mkimage -A MIPS -O Linux -T kernel -a 0xa0020000 -C lzma -e 0xa0020000 -n "PON_1.18.1" -d zImage kernel.bin - bootcore.bin
-
dumpimage -T kernel bootcore.bin -o u-boot.bin mkimage -A MIPS -O Linux -T kernel -a 0x88000000 -C none -e 0x88000000 -n "MIPS 4Kec Bootcore" -d u-boot.bin bootcore.bin - rootfs.img
-
unsquashfs -d rootfs rootfs.img
mksquashfs
mkimage -A MIPS -O Linux -T filesystem -C none -n "<version>" -d rootfs.squashfs rootfs.bin
cat kernel.bin bootcore.bin rootfs.bin > multicast.img
Upgrade Script
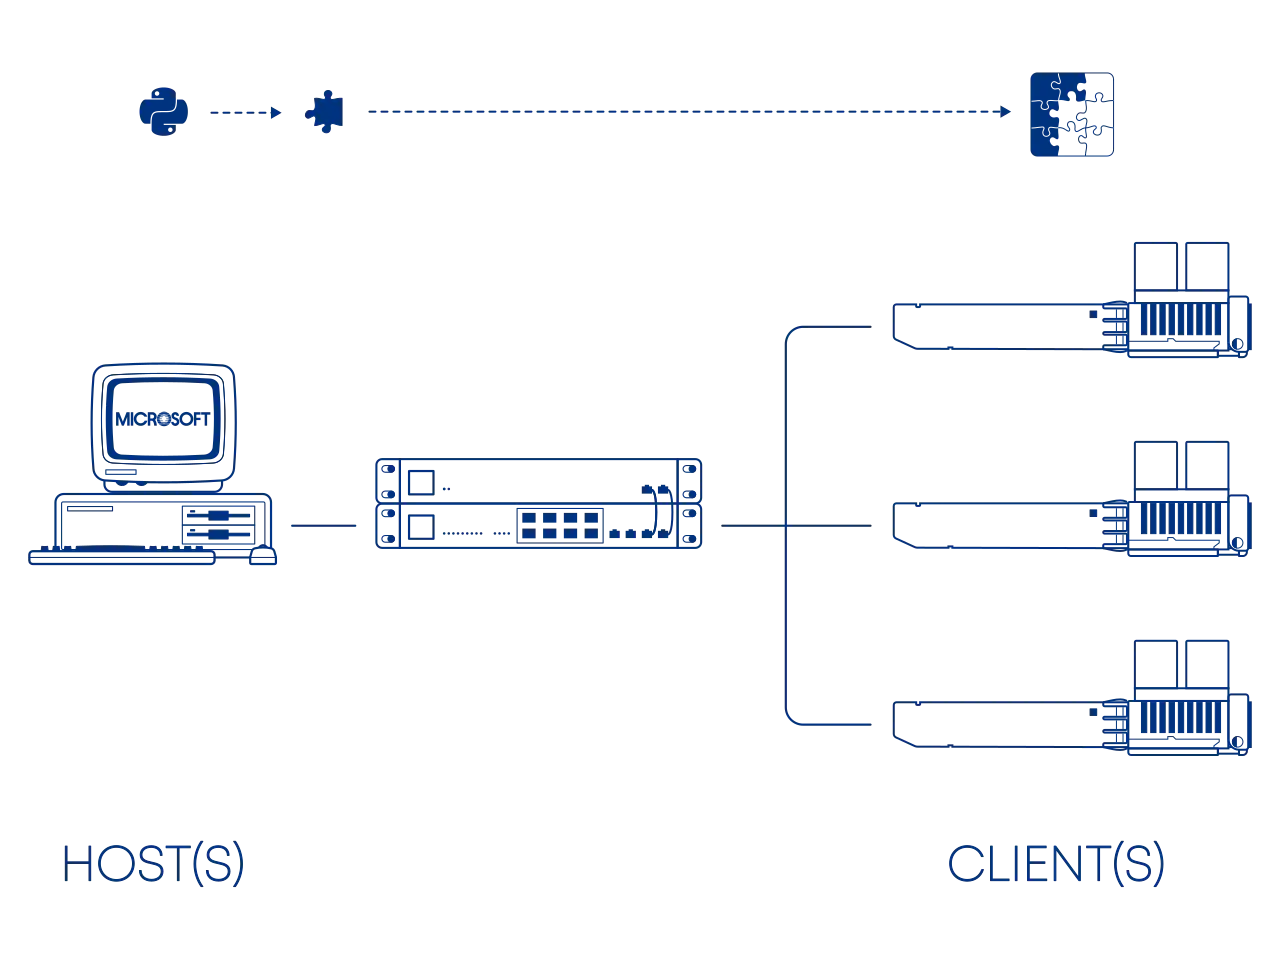
Python installation varies by Operating System and has been outlined by the tutors at Real Python — Python 3 Installation & Setup Guide.
Host setup
Download
curl https://gist.github.com/djGrrr/802c5652d3610d3e0a63243fe1119c56/raw/3d9feef42107232e0ef7f2a4c469a00e915a16d3/multicast_upgrader.py
chmod +x multicast_upgrader.py
curl.exe https://gist.github.com/djGrrr/802c5652d3610d3e0a63243fe1119c56/raw/3d9feef42107232e0ef7f2a4c469a00e915a16d3/multicast_upgrader.py
The upgrade script works with the multicast_update.img and multicast_reset.img files from the 8311 community firmware archive, which you can download at:
https://github.com/djGrrr/8311-was-110-firmware-builder/releases/latest
Requirements
- 10G SFP+ port
-
A 10-gigabit compatible SFP+ host interface, such as a NIC, media converter, and/or network switch with its port settings forced to 10Gbps. If using a switch, it's important to disable STP on the port(s).
Info
The ethernet side of the WAS-110 is forced to 10GBASE-KR1 in U-Boot as can be observed from the environment variable
lan1-xpcs-mode; It won't fallback to 1G.fw_printenv lan1-xpcs-modeenv print lan1-xpcs-modeIf you are flashing with a 2.5G port (like a switch or a SFP Media Buddy) you must force the SFP+ side to use 2P5G_SGMII_MODE.
fwenv_set lan1-xpcs-mode 2P5G_SGMII_MODEenv set lan1-xpcs-mode 2P5G_SGMII_MODE env save env save - Static IP address
192.168.1.2/24 -
ip address add 192.168.1.2/24 dev <interface>netsh interface ipv4 set address name="<interface name>" static 192.168.1.2 255.255.255.0 192.168.1.1 - Static ARP entry
-
Unicast (1 to 1)
arp -s 192.168.1.1 00:E0:92:00:01:40netsh interface ipv4 add neighbors "<interface name>" 192.168.1.1 "00-E0-92-00-01-40"Multicast
arp -s 192.168.1.1 01:E0:92:00:01:40netsh interface ipv4 add neighbors "<interface name>" 192.168.1.1 "01-E0-92-00-01-40"
Usage
Without serial access, you'll be running blind. Proceed with caution and take more time between the steps
Upgrade
-
Remove the WAS-110
-
Run the
multicast_upgrader.pyscript./multicast_upgrader.py --path=multicast_upgrade.imgpython3.exe multicast_upgrader.py --path=multicast_upgrade.img -
Insert the WAS-110
-
Wait several minutes (3-5)
-
Press Ctrl+X to end the
multicast_upgrader.pyscript -
Reseat the WAS-110
Run a continuous ping
To recieve an early indication that the WAS-110 has completed its first boot, run a continuous ping:
ping 192.168.11.1
Reset
Previous settings will be backed up and stored in /ptconf.
It is advisable to reflash with a regular image afterward, as your settings may be unintentionally restored to their defaults if the backup file is not present or has been removed.
-
Remove the WAS-110
-
Run the
multicast_upgrader.pyscript./multicast_upgrader.py --path=multicast_reset.imgpython3.exe multicast_upgrader.py --path=multicast_reset.img -
Insert the WAS-110
-
Wait several minutes (3-5)
-
Press Ctrl+X to end the
multicast_upgrader.pyscript -
Reseat the WAS-110
Run a continuous ping
To recieve an early indication that the WAS-110 has completed its first boot, run a continuous ping:
ping 192.168.11.1