Install the 8311 community firmware on the WAS-110

Group buy participants...
Just a reminder that your WAS-110 should have come pre-flashed with the 8311 community firmware unless otherwise indicated.
Please ignore the Azores shell upgrade and web UI upgrade sections mentioned below. To update your WAS-110 to a newer 8311 community firmware release, refer to the instructions in the supplementary upgrade section.
Out of the box, the WAS-110 is not fully compatible with varying ISP OLT configurations, with issues ranging from vendor-specific managed entities to VEIP to IEEE standards such as 802.1X and 802.1ad. Due to these incompatibilities and discovered bugs, a community firmware1 has been curated to fix any impeding issues2.
Firmware Preparation
Download firmware
The community firmware comes in two (2) variants: basic and bfw; for the purposes of this guide, we'll focus on the recommended basic firmware, which can be downloaded at:
https://github.com/djGrrr/8311-was-110-firmware-builder/releases/latest
As an example, the following command downloads the basic firmware into the current users download directory.
curl.exe -L --output-dir %UserProfile%\Downloads -O https://github.com/djGrrr/8311-was-110-firmware-builder/releases/download/v2.8.0/WAS-110_8311_firmware_mod_v2.8.0_basic.exe
curl -L --output-dir ~/Downloads -O https://github.com/djGrrr/8311-was-110-firmware-builder/releases/download/v2.8.0/WAS-110_8311_firmware_mod_v2.8.0_basic.7z
The basic firmware is based on a vanilla MaxLinear OpenWrt 19.07 build from Potrontec. Additionally, it includes customized luci web interfaces for hassle-free masquerading and the aforementioned fixes. And unlike the bfw variant, it does not include the abysmal BFW patches and cruft.
Extract download
The community firmware upgrade comes bundled as a self-extracting executable ( Windows only) or a 7-Zip archive and includes:
local-upgrade.img-
Used with the Azores web upgrade utility.
local-upgrade.tar-
Used with the universal shell upgrade command sequence.
To extract the archive to a temporary directory, execute the following command(s):
Replace <version> with the downloaded version.
Self-extracting Executable
Double-click on the exe file in Windows File Explorer.
7-zip
7z e "-i!local-upgrade.*" %UserProfile%\Downloads\WAS-110_8311_firmware_mod_<version>_basic.7z -o%Temp%\8311
macOS Archive Utility mangles the extracted local-upgrade.tar
The following commands assume Homebrew is installed
brew install sevenzip
7zz e '-i!local-upgrade.*' ~/Downloads/WAS-110_8311_firmware_mod_<version>_basic.7z -o/tmp
Network setup
Plug the WAS-110 into a 10-gigabit compatible SFP+ host interface, such as a NIC, media converter, and/or network switch.
Rx loss
The WAS-110 running the default Azores firmware will trigger RX_LOS if the SC/APC fiber cable is unplugged or inactive. Some host interfaces will enter a power-saving state, making the WAS-110 inaccessible.
The default IP address of the WAS-110 is 192.168.11.1/24. To connect successfully, follow one (1) of the configurations in the Accessing the ONT guide and proceed.
Test optics
Before any installation, it's highly recommended to do a simple optics fault test on the WAS-110. If the signal(s) are abnormal, contact the seller immediately to start the RMA process. If you're uncertain, please double-check on the 8311 Discord.
Dump & backup firmware optional
-
Enable SSH from the web UI by following the steps outlined below in the shell upgrade section.
-
Log in to the WAS-110 remote shell over SSH using the root shell credentials.
ssh -oHostKeyAlgorithms=+ssh-rsa -oPubkeyAcceptedKeyTypes=+ssh-rsa root@192.168.11.1 -
Execute the following command sequence from the WAS-110 remote shell to dump the WAS-110's volumes into its temporary directory and exit from the remote shell.
mkdir -p /tmp/fw; for part in kernelA bootcoreA rootfsA kernelB bootcoreB rootfsB; do VOL=$(ubinfo /dev/ubi0 -N "$part" | grep "Volume ID" | awk '{print $3}'); [ -n "$VOL" ] && { DEV="/dev/ubi0_$VOL"; OUT="/tmp/fw/ubi0_$VOL-$part.img"; echo "Dumping $part ($DEV) to: $OUT"; dd if="$DEV" of="$OUT"; }; done; exit -
Execute the following command from the host PC terminal (not the WAS-110 remote shell) to back-up the dumped volumes to your local user directory.
Prior to Windows 11 Build 22631.4391 (KB5044380) and Windows 10 Build 19045.5073 (KB5045594)...
The
scpcommand used the legacy SCP protocol without the need for specifying the-Ooptional parameter. If you're using an older Windows build or an OpenSSH version before 8.9.0.0, please remove-Ofrom thescpcommand parameters.systeminfo ssh -V # (1)!- OpenSSH version info
If you continue to have issues, consider installing and running WinSCP, a GUI client.
Command Prompt
cd /D %UserProfile% & scp -O -oHostKeyAlgorithms=+ssh-rsa -oPubkeyAcceptedKeyTypes=+ssh-rsa root@192.168.11.1:/tmp/fw/ubi* .Powershell / Windows Terminal
cd /D %UserProfile%; scp -O -oHostKeyAlgorithms=+ssh-rsa -oPubkeyAcceptedKeyTypes=+ssh-rsa root@192.168.11.1:/tmp/fw/ubi* .cd ~/; scp -O -oHostKeyAlgorithms=+ssh-rsa -oPubkeyAcceptedKeyTypes=+ssh-rsa 'root@192.168.11.1:/tmp/fw/ubi*' ./
Shell upgrade recommended
The extracted local-upgrade.tar includes a safer upgrade script in comparison to the built-in web UI.
Enable SSH
SSH must be enabled from the web UI prior to running the shell commands.


-
Navigate to https://192.168.11.1/html/main.html#service/servicecontrol in a web browser and enter your admin web credentials.
-
On the Service Control page, check the SSH checkbox and click Save.
Upgrade firmware
Run the following commands from the host terminal to upgrade to the 8311 community firmware.
-
Input the root shell credentials if prompted.
Prior to Windows 11 Build 22631.4391 (KB5044380) and Windows 10 Build 19045.5073 (KB5045594)...
The
scpcommand used the legacy SCP protocol without the need for specifying the-Ooptional parameter. If you're using an older Windows build or an OpenSSH version before 8.9.0.0, please remove-Ofrom thescpcommand parameters.ssh -V # (1)!- OpenSSH version info
If you continue to have issues, consider installing and running WinSCP, a GUI client.
Also, a popular GUI alternative to the
sshcommand is Putty.scp -O -oHostKeyAlgorithms=+ssh-rsa -oPubkeyAcceptedKeyTypes=+ssh-rsa %Temp%\8311\local-upgrade.tar root@192.168.11.1:/tmp/ ssh -oHostKeyAlgorithms=+ssh-rsa -oPubkeyAcceptedKeyTypes=+ssh-rsa root@192.168.11.1 "tar xvf /tmp/local-upgrade.tar -C /tmp/ -- upgrade.sh && /tmp/upgrade.sh -y -r /tmp/local-upgrade.tar"scp -O -oHostKeyAlgorithms=+ssh-rsa -oPubkeyAcceptedKeyTypes=+ssh-rsa /tmp/local-upgrade.tar root@192.168.11.1:/tmp/ ssh -oHostKeyAlgorithms=+ssh-rsa -oPubkeyAcceptedKeyTypes=+ssh-rsa root@192.168.11.1 'tar xvf /tmp/local-upgrade.tar -C /tmp/ -- upgrade.sh && /tmp/upgrade.sh -y -r /tmp/local-upgrade.tar' -
Once rebooted, enjoy this labor of love from the 8311 community. As a first step, we recommend performing a supplementary upgrade.
New SSH host keys will be generated
Don't be alarmed when attempting to connect over SSH into the newly installed firmware and the following warning is presented:
@@@@@@@@@@@@@@@@@@@@@@@@@@@@@@@@@@@@@@@@@@@@@@@@@@@@@@@@@@@
@    WARNING: REMOTE HOST IDENTIFICATION HAS CHANGED!     @
@@@@@@@@@@@@@@@@@@@@@@@@@@@@@@@@@@@@@@@@@@@@@@@@@@@@@@@@@@@
IT IS POSSIBLE THAT SOMEONE IS DOING SOMETHING NASTY!
Someone could be eavesdropping on you right now (man-in-the-middle attack)!
It is also possible that a host key has just been changed.
The fingerprint for the ECDSA key sent by the remote host is
SHA256:Y3WzWezEYQi5374JfEa4KMm2nqfkj7raMyZIi6TS+X4.
Please contact your system administrator.
Add correct host key in /home/8311/.ssh/known_hosts to get rid of this message.
Offending ECDSA key in /home/8311/.ssh/known_hosts:1
Host key for 192.168.11.1 has changed and you have requested strict checking.
Host key verification failed.
Simply delete the old host ID by running the following command and retry:
ssh-keygen -R 192.168.11.1
Web UI upgrade not recommended
Proceed with caution!
The Azores firmware upgrade utility on occasion is known to soft-brick itself. To recover, a host device with serial breakout on SFP pins 2 (rx) and 7 (tx) will be required.
Alternatively, jump to the safer shell upgrade within this guide.

50/50 chance of soft-bricking the WAS-110 if proceeded!
-
Navigate to https://192.168.11.1/html/main.html#admin/upgrade in a web browser and enter your admin web credentials.
-
On the Firmware Upgrade page, browse for the
local-upgrade.imgfile from the extracted download and click Upgrade. -
Patiently wait out the process, 4 to 5 minutes, or until the web session becomes unresponsive.
Run a continuous ping
To recieve an early indication that the WAS-110 has completed its upgrade reboot cycle, run a continuous ping:
ping -t 192.168.11.1ping 192.168.11.1 -
Once rebooted, enjoy this labor of love from the 8311 community. As a first step, we recommend performing a supplementary upgrade.
Supplementary upgrades
A/B architecture
block
  block:BOOT
    columns 1
    mtd0("<b>uboot</b><br/>/dev/mtd0")
    mtd1("<b>ubootconfigA</b><br/>/dev/mtd1")
    mtd2("<b>ubootconfigB</b><br/>/dev/mtd2")
  end

  block:UBI("/dev/ubi0")
    columns 2
    block:A("Slot A")
      columns 1
      mtd9("<b>kernelA</b><br/>/dev/mtd9")
      mtd10("<b>bootcoreA</b><br/>/dev/mtd10")
      mtd11("<b>rootfsA</b><br/>/dev/mtd11")
    end
    block:B("Slot B")
      columns 1
      mtd12("<b>kernelB</b><br/>/dev/mtd12")
      mtd13("<b>bootcoreB</b><br/>/dev/mtd13")
      mtd14("<b>rootfsB</b><br/>/dev/mtd14")
    end
    block:PERSIST:2
      columns 1
      mtd15("<b>ptconf</b><br/>/dev/mtd15")
      mtd16("<b>rootsfs_data</b><br/>/dev/mtd16")
    end
  end

  classDef slateContainer fill:#e2e8f0,stroke:#1e293b,stroke-width:3px
  classDef slateSubBlock fill:#f8fafc,stroke:#94a3b8,stroke-width:2px,font-weight:bold
  classDef slateNode fill:#fff,stroke:#475569,stroke-width:1px

  class BOOT slateContainer
  class UBI slateContainer
  class A,B slateSubBlock
  class mtd0,mtd1,mtd2,mtd9,mtd10,mtd11,mtd12,mtd13,mtd14,mtd15,mtd16 slateNode
  class PERSIST slateSubBlock
The WAS-110 uses an A/B architecture, which means there are two adjacent firmware images: an active image (the currently running firmware) and an inactive image. Either image can be selected as active, and upon upgrade, the inactive image will be overwritten and become the newly active image after reboot, i.e. committed image.
Furthermore, the OLT has the capability to select the active firmware image, upgrade the inactive image, and reboot the ONT. It is therefore recommended to install the community firmware on both A and B slots.
Web UI upgrade safe
Integrity first and foremost
The 8311 community firmware re-uses the safe shell upgrade logic throughout. Those who prefer the CLI may continue to use the shell upgrade method going forward.
Furthermore, the 8311 community firmware includes an up-to-date dropbear4 build, which does not require the use of weak algorithms when using an SSH client, i.e.
-oHostKeyAlgorithms=+ssh-rsa -oPubkeyAcceptedKeyTypes=+ssh-rsa
can be removed from future command usage.


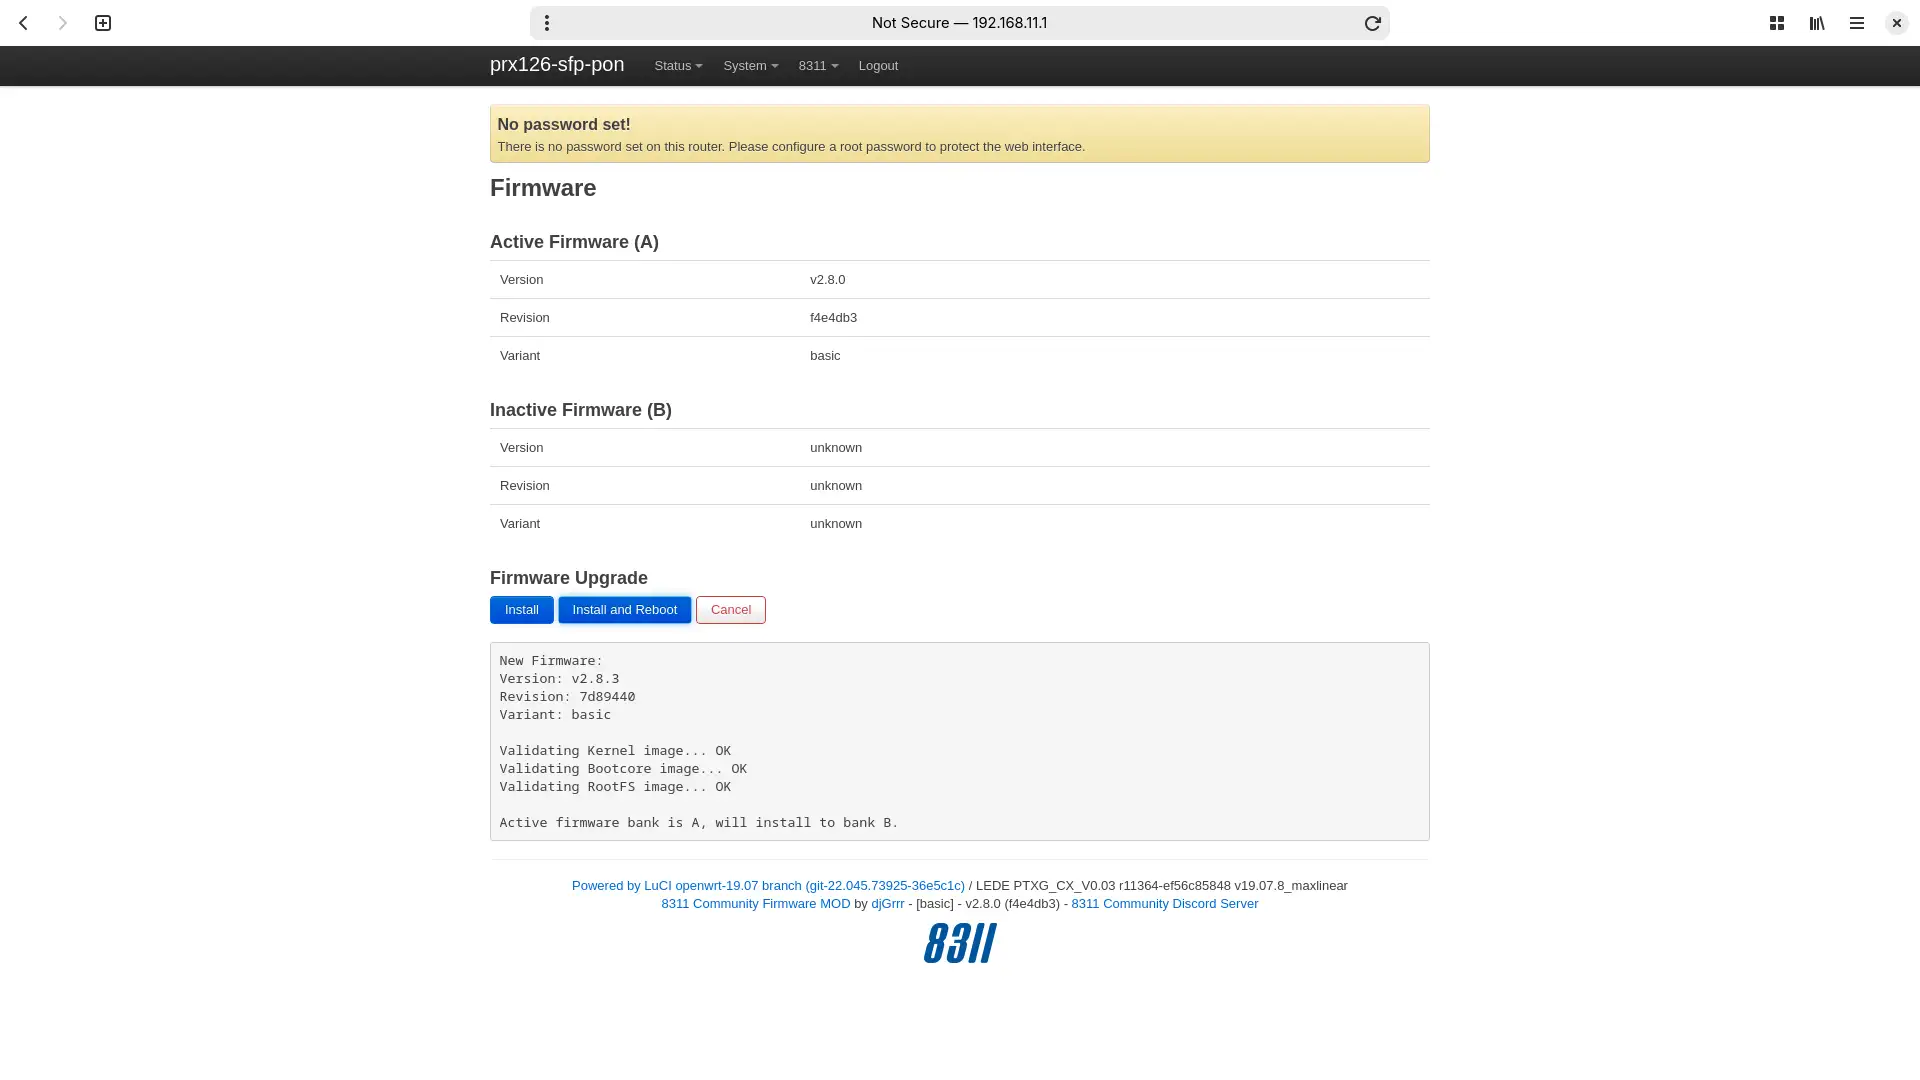
-
Navigate to https://192.168.11.1/cgi-bin/luci/admin/8311/firmware in a web browser and enter your root password if prompted.
-
On the Firmware page, browse for the
local-upgrade.tarfile from the extracted download and click Upload. -
Once the upload is complete, click Install and Reboot to finish the upgrade.
Run a continuous ping
To recieve an early indication that the WAS-110 has completed its upgrade reboot cycle, run a continuous ping:
ping -t 192.168.11.1ping 192.168.11.1 -
Once rebooted, enjoy this labor of love from the 8311 community. As a first step, we recommend performing a supplementary upgrade.
Factory Reset
8311 configuration is stored within U-Boot environment variables.
-
Log in to the WAS-110 remote shell over SSH as the root user:
ssh root@192.168.11.1Forgot your root password?
If you have forgotten your 8311 root password, you can reset it by following the Multicast Upgrade and Community Firmware Recovery guide.
-
Remove all 8311 U-Boot environment variables:
fw_printenv | awk -F'=' '/^8311/ {print $1}' | xargs fw_setenv -
Verify all 8311 environment variables have been successfully removed:
fw_printenv | grep '^8311'